


In this blog post, we’re excited to share a quick and easy method for preserving the beauty of flowers using a DIY microwave flower press. Pressed flowers can be a lovely addition to crafts, home décor, and gifts. You can transform fresh blooms into stunning flat creations in minutes with just a few simple materials and a microwave. Whether you’re an experienced crafter or looking for something fun on the weekend, this guide will help you make your flower press so that your floral memories last long after their petals have fallen off. Let’s get started.
How to Press Flowers with a Microwave Flower Press?
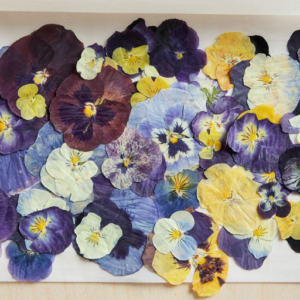
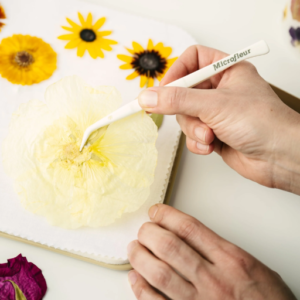
Image source: https://www.bhg.com/
You will need fresh flowers, absorbent paper (like paper towels), and a microwave-safe plate to create your microwave flower press. First, cut the stems of the blossoms down to about 1 inch long and remove any unwanted leaves from them. Then place one piece of absorbent paper onto the plate, followed by laying down face-down flowers onto it before covering them with another sheet/towel over the top again; now put everything into the microwave where it should be heated up for thirty seconds at intervals until drying without burning takes around one minute total but no more than three max cools when finished so take caution while removing cooled specimens carefully afterward because they are ready for use in crafting projects.
What Materials Are Needed for a Microwave Flower Press?
To make a DIY microwave flower press, you will require the following materials:
- Fresh Flowers: For better results, choose flowers with flat petals.
- Absorbent Paper: To absorb moisture from flowers, use paper towels, blotting paper, or coffee filters.
- Microwave-Safe Plate: This will hold the absorbent paper and the flowers in the microwave.
- Heavy Books or Weights: Optional if you do not have a dedicated flower press for added pressure.
- Tweezers: Useful when handling delicate pressed flowers after they have cooled down.
- Scissors: To trim stems and leaves before pressing them
You can easily make beautiful pressed flower art with just these simple materials!
Step-by-Step Guide to Using a Microwave Flower Press
- Gather Materials: Bring all necessary items, such as fresh blooms, microwavable containers, and paper towels.
- Prepare the Flowers: Choose your blossoms and cut their stems to your preferred length. Remove any extra foliage so that attention is focused only on the petals.
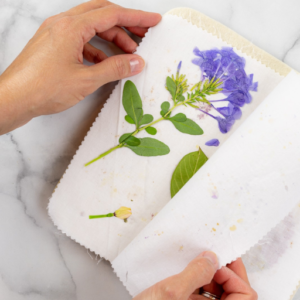
- Layer the Flowers: Place one towel or blotting paper at the bottom of the microwavable container. Then, arrange the flowers in a single layer without touching each other, followed by another cover using the same type of material.
- Microwave: Set the microwave at medium power level and heat for 1-3 minutes, checking every 30 seconds, until fully dried out. The time may vary depending on the type and moisture content of the flower itself.
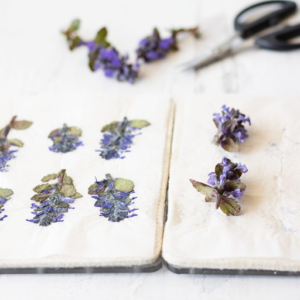
- Cool and Check: Allow a cooling period after microwaving for a few minutes before carefully removing the tweezers used previously. Then, inspect the dryness levels reached during the process—repeat if necessary, but shorter duration increments are advised due to potential overheating issues; otherwise, it dried out too quickly, causing browning spots.
- Store or Use: After being allowed sufficient time, cool down completely and ensure thorough drying. Either stash them away somewhere dry and flat, OR go ahead immediately and start using them for crafting projects involving artsy stuff like scrapbooking cards, making gifts, photo albums, collages, and decorating walls, interiors, rooms, offices, and houses.
So follow the steps below when pressing a quick flower in the microwave. You can keep those beauties around for all kinds of creative endeavors!
Common Mistakes to Avoid When Pressing Flowers
- Using Wilted or Overripe Flowers: Only use fresh flowers for pressing. Wilting or overripe flowers do not always keep their color and shape, resulting in a poor outcome.
- Not Checking Progress Frequently: A common mistake for beginners when microwaving flowers is to assume that the first timing was good enough. You should check on your flowers every 30 seconds to prevent them from burning or scorching and ruining their appearance.
- Inadequate Drying: Not properly drying the pressed flowers can cause mold to grow. Pressed flowers must be stored in a cool, dry place until they are scorched before being used in projects.
Familiarizing yourself with these frequent missteps will improve your flower pressing technique and create more beautiful and long-lasting creations.
What Are the Benefits of Using a Microwave Flower Press Kit for Adults?
Using a microwave flower press kit benefits grown-ups who want to preserve flowers. First, it significantly reduces the time needed compared with traditional methods that take longer than you’d like. This means quicker results! Furthermore, this type of kit comes with specific materials and directions explicitly designed for maximum drying efficiency so that colors stay bright. At the same time, shapes remain true to life after being subjected to heat during pressing operations. Also, because there’s no need for heavy books or other bulky equipment like what would be required by more complicated techniques (i.e., those requiring pressers), microwave kits are easier overall — even for newbies! Lastly, since these handy devices don’t take up much space at all when they’re stored away between uses (which helps keep things organized), anyone looking into purchasing one should have no problem finding room where supplies could go together neatly without creating clutter around work areas later down line either way roundabout manner wise getting back again towards original point made earlier about how very compact nature plus small size means easy storage thereby promoting less messiness overall during crafting sessions involving different kinds crafts besides just flower preservation alone too maybe.
Faster Results with Microwave Pressing vs. Traditional Pressing
Speed is where microwave flower pressing comes out on top compared to traditional methods. Optimal results using traditional techniques can take a few weeks and several months, while flowers will typically be fully dried in only minutes in the microwave. The drying process is sped up due to this method’s ability to heat and evaporate moisture quickly. Many of these kits use special materials that help distribute heat evenly, reducing the chances of burning any part of your beautiful flowers. Crafters rejoice – you can instantly have fresh, vibrant, pressed flowers.
Creativity in Pressed Flower Art with a Microwave Flower Press
A new world of unique floral art creation opens using a microwave flower press. Different petals and leaves can be mixed for different textures and colors as they dry within minutes. This process involves experimenting with various arrangements/designs and quick drying. To personalize their projects, many crafters like making homemade greeting cards or bookmarks framed art pieces with pressed flowers added onto them since it gives such an artistic touch! Besides that, because speed allows ease, giving room for spontaneity, artists are encouraged by nature’s transient beauty inspiring seasonal blooms collected from the environment around them, creating works inspired by short-lived creations found throughout different times during each year; therefore, they should consider all seasons’ flowers at least once throughout their lives (or more!). Also, don’t forget about tutorials showing how best to include resin art jewelry home decor made using these beauties – so much inspiration available online awaits eager hands looking forward to expanding their creative repertoire even further.
Best Practices for Using a Flower Press Kit for Adults
Using a flower press kit correctly can greatly improve the quality of your pressed floral creations. Below are some best practices gathered from experts in the field:
- Choose Fresh Flowers: Look for perfect blooms at their peak. Pick flowers early in the day, after any dew has evaporated, to ensure they have less moisture content.
- Prepare Your Blooms: To prevent mold from developing, trim stems and remove excess greenery around them. Flatten out the flowers so the petals don’t overlap each other, which will cause uneven pressing.
- Use Suitable Materials: To soak up water while drying, use blotting paper or other absorbent materials within your press to avoid staining and promote even drying.
- Track Drying Time: Keep notes on how long each type of flower takes to dry, as different varieties may take longer than others. Check frequently until you achieve your desired level of dryness.
- Store Pressed Flowers Correctly: After drying, put them away in a cool, dark place between sheets of acid-free paper to prevent fading or damage over time. Consider using archival-quality storage solutions if you want the best preservation possible for works like these!
- Try Out New Things and Be Creative: Don’t be afraid to mix different kinds of flowers and arrange them differently. Since there are so many ways you could use pressed flowers, such as cards, jewelry, etc., get creative!
By following these tips, crafters can ensure that their projects turn out beautiful and last long enough to appreciate nature’s beauty forever.
How do you dry flowers in the microwave quickly and efficiently?
Flowers can be dried in the microwave quickly, and the results are awe-inspiring. To dry flowers using a microwave, follow these steps:
- Choose Fresh Flowers: If you dry flowers in the microwave, they should be as fresh and unblemished as possible. Smaller blooms tend to work best.
- Prepare Your Flowers: Remove any leaves that might touch the drying surface and cut stems to your desired length. Think about how you want the flowers positioned for visual appeal.
- Use a Microwave-Safe Container: Place the flowers between paper towels or silica gel in a heat-safe container. Moisture is absorbed more effectively by silica gel, hence its popularity.
- Microwave at Intervals: Start with 30-second intervals of low to medium heating. After each interval, check if they are dry enough — it’s better to under-dry than over-dry.
- Cool It Down And Store: Allow cooled dried flowers to sit before placing them into an airtight container in a cool, dark place where color will be preserved best.
These steps will enable you to quickly dry flowers while preserving their beauty for several crafting projects.
Which Flowers Are Best Suited for Microwave Drying?
When choosing which flower types work best for this heating technique, consider those known for retention of structure as well as brilliant hues according to various articles currently available online:
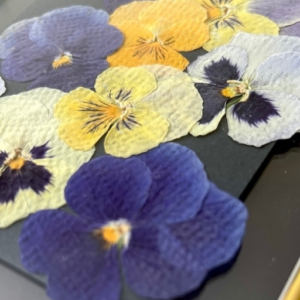
- Pansies: Because they’re flat shaped with bright colors, these specimens become even lovelier post-microwave drying process
- Marigolds: Strong but still able to hold onto colors during fast-drying procedures make marigold crafts stand out from others
- Daisies: Simple designs allow equal distribution of heat, resulting in a pleasing appearance suitable across many different activities
Other good candidates include zinnias, lavender asters, and others that lend themselves well to visually appealing end products through microwaving methods used by crafters alike. Finally, ensure selected blooms are fresh-looking and free from damage; otherwise, preservation won’t work correctly.
How Long Does It Take for Flowers to Dry in the Microwave?
Depending on their moisture and type, Flowers generally take 1 to 3 minutes in the microwave to dry. Different references suggest starting with 30-second intervals and checking for dryness after each interval as a general rule of thumb. For marigolds and pansies, one or two minutes is usually enough; however, thicker petals like rose petals may require slightly longer drying times. Be sure to keep a close eye so that overheating does not result in burnt flowers or discoloration. Slight changes in timing might be needed for different types of flowers, so some trial-and-error may be necessary to achieve the best results.
Tips for Achieving Perfectly Dried Flowers
- Use Silica Gel: If you have delicate blooms that need gentle drying treatment, consider using silica gel. This substance helps retain flowers’ natural shape and color while absorbing moisture. Simply bury the blossoms in the gel, then wait several days.
- Avoid Overcrowding: Flowers should not be overcrowded when dried, whether in microwave ovens or other ways, because this will allow better air circulation, ensuring evenness throughout all parts and preventing damp spots, which can lead to mold growth and discoloring.
- Store Properly: After drying out, place them inside an airtight container in a cool, dark location. Exposure to light and air may fade colors and degrade texture over time; thus, proper storage is essential for maintaining beauty long-term.
- Experiment With Timing: Different types of flowers have different moisture levels requiring varying lengths of time to dry completely, so it’s best practice to start with shorter durations gradually increasing until fully dry while monitoring closely to avoid overheating next time around and keeping track of previous records made during experiments involving new flower species could refine your process more efficiently than before
- Consider the Season: Harvesting flowers early in the morning, when there is typically less dew, contributes to a faster drying process; therefore, retaining vibrant colors and shapes should always be done at this hour.
Following these tips, you can achieve beautifully dried flowers that maintain color and form for your crafting needs.
Can You Use Thick Flowers in a Microwave Flower Press?
Special considerations must be considered when using a microwave flower press on thick blooms. For example, flowers with more thickness will have higher moisture content, which can cause uneven drying or even burning if not overseen. To dry thick petals successfully, you should cut them down so that they are smaller, take less time, and give better results when dried out. You can also use absorbent paper layers or a microwave-safe flower press to manage moisture levels. Always start with shorter heating times to prevent damage, and regularly check how dry the item gets.
How to Prepare Thick Flowers for Microwave Pressing
Here’s how best to prepare thicker flowers for pressing in the microwave:
- Select And Trim: Use only healthy-looking thick flowers and trim their stems to about one inch long while removing any extra leaves that might interfere during drying.
- Cut Into Sections: Huge flowers should be cut into smaller pieces, as this will help reduce the overall time needed to dry out completely and ensure evenness throughout.
- Use Absorbent Materials: Place your cut blooms between sheets of paper towels or tissue paper, which can absorb excess moisture during drying.
- Utilize A Flower Press: If possible, always use a specially designed microwavable flower press since it gives better results. Make sure it has been layered appropriately with some space between each layer, allowing airflow while taking care of absorbed water.
- Monitor Drying Times: When checking on progress after starting with short increments, such as 30 seconds up until one-minute long periods, repeat until fully dried, but remember to watch out for signs indicating scorching may occur.
- Cooling And Storage: Once done, let cool inside presses before taking out, then store away from the light source; otherwise, colors fade quickly, thus losing attractiveness over time
Following these guidelines ensures success when preparing heavyweight blossoms for quick micro-waving without compromising their beauty.
Best Techniques for Pressing Thick Flowers
Specific methods must be followed when pressing thick flowers to keep their shape and color.
- Use Heavy Books: Place the flowers between absorbent paper and put them inside a heavy book. This technique applies consistent pressure and allows for even drying over an extended period. Ensure the book is arid so that moisture does not get trapped inside.
- Microwave Flower Press: As mentioned before, microwave-safe flower press can yield fast results. For this technique, you must lay flowers between absorbent materials and microwave them quickly. Be careful not to burn the flowers by checking on them frequently.
- Dehydrator Method: If you have one available, using a food dehydrator can ensure heat is distributed evenly throughout the process. Set it at a low temperature and place your flowers on the trays until they are dry but retain their original color and shape.
These methods can result in beautiful pressed flowers for crafts or decoration purposes.
Maintenance Tips for the Microwave Flower Press When Using Thick Flowers
It is important to keep your microwave flower press efficient and in good condition when working with thick flowers. Here are a few maintenance tips for you:
- Routine Cleaning: Wipe the microwave flower press with a damp cloth to remove any residues or moisture after every use. This avoids mold formation and keeps the press clean for next time.
- Inspect for Damage: The press should be checked regularly for signs of wear or damage, such as plate cracks and loose parts. Deal with such problems as soon as they arise to ensure top performance.
- Storing It Correctly: When not in use, store the press at room temperature away from moisture, undertaking heavy objects over it so that its plates do not become warped.
- Use Dry Materials: Always ensure that flowers and absorbent materials are sufficiently dried before pressing them together. Too much water can damage your machine, making it less effective when used again and affecting the quality of pressed flowers.
By taking care of your appliance this way, you will increase its lifespan while consistently producing beautifully pressed thick flowers every time.
What Are the Customer Reviews on Various Flower Press Kits?
Customer reviews on flower press kits vary greatly, but many people find microwave flower presses convenient and effective. Many users love these kits because they help preserve bright colors and intricate flower structures, making them perfect for crafts. Other reviewers have pointed out that thickness may affect results where thicker varieties require longer drying times than thinner ones. Buyers prefer all-inclusive kits containing absorbing materials and clear instructions since this enhances their overall experience. Some minor concerns about durability and size were raised by users who still appreciated how much time was saved compared to traditional methods.
Popular Microwave Flower Press Kits Reviewed
- Kraftika Microwave Flower Press Kit: This kit is unique because it’s easy to use and has everything you need to preserve flowers successfully. Customers love how well it keeps the color and details in pressed flowers. The microwave instructions have also been highly reviewed, making for a quick and easy process.
- Sewing Daisy Flower Press: This press kit is often praised for its strong build and is known for lasting long. Users like the included directions, which they say help with the quality of the final, pressed flower and absorbent sheets. Some reviews say it works best on thinner flowers, while others claim delicate petals provide the best results.
- Crazypan Microwave Flower Press: This kit contains many absorbent materials and provides step-by-step directions for all-inclusive solutions. Reviewers note its ability to retain the beauty of different kinds of flowers. Some reviews suggest it may be significant, but most users appreciate fast pressing time and quality output.
Comparison Between Microfleur and Other Kits
Several things to remember when comparing Microfleur flower press kits against other popular options. What makes Microfleur stand out from other brands is its patented microwave technology, which significantly cuts down flower pressing time from hours to days to minutes! Many customers report more vibrant colors after drying this product than any other brand they’ve tried, so it’s no wonder people love this one!
On the other hand, Kraftika or Sewing Daisy might be sturdier because they are made for heatless/weight-based pressure users who prefer traditional methods over modern ones like microwaves. Even though these kits gain popularity due to their excellent construction durability, pressing times become extremely lengthy, requiring tons of patience and manual labor!
The Crazypan offers a middle ground between ease of use and preservation but lacks speed compared to Microfleur. Therefore, if looking specifically at efficiency versus effectiveness, something else should be considered too! Overall speaking though, while Microfleur may be best suited for those wanting quick results without compromising beauty elsewhere, who still want something rugged enough, long-lasting enough hands-on experiences during presses, then look elsewhere, such as Crazypan, where finishes aren’t quite perfect every time but speeds up the process quite significantly.
What Features Do Customers Look for in a Flower Press Kit?
Customers typically look for things that improve their pressing experience when looking for a flower press kit. First, ease of use is key; many users gravitate towards kits with intuitive designs or clearly outlined instructions that simplify pressing flowers. The quality of materials used in these kits is also essential to buyers who want durable and absorbent items capable of delivering desired results while keeping the natural beauty of flowers intact. Moreover, pressing time matters, too, since most enthusiasts prefer kits that take less time but still produce high-quality results. Adjustability and size are additional features influencing purchasing decisions as they allow users to press different kinds and sizes of flowers at once. Finally, customer reviews play an essential role in swaying buyers because people often seek assurance from other users about how effective a product is before making a purchase.
How to Incorporate Pressed Flowers into Resin Art?
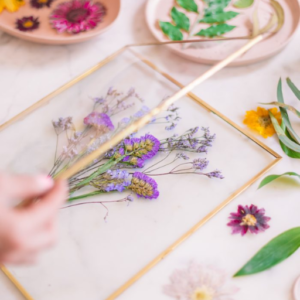
Resin art incorporating pressed flowers makes for beautiful pieces that preserve delicate beauty. Start by choosing well-dried pressed florals with preserved color and shape. According to the manufacturer’s directions, mix thoroughly so it cures clear, then pour some into your mold. Next, place your arranged blooms gently on top, then add more resin until completely covered, taking care not to trap air bubbles during this stage. Let sit undisturbed for 24-48 hrs, depending on the brand used. After that, you can remove it from the mold, revealing a stunning creation showcasing your floral treasures within.
Tips for Embedding Pressed Flowers in Resin Crafts
- Pick the Right Flowers: Look for smaller flowers with less moisture content. These are less likely to expand or change shape during the resin curing. Ferns and daisies can be dried and used.
- Seal Your Flowers: Before embedding pressed flowers, use a clear acrylic spray to prevent colors from bleeding into the resin and keep vibrant hues intact.
- Pouring Flowers: When working with multiple flowers, pour resin in layers. This allows you to place them better without having them float to the top and ensures they will not touch each other while setting. Let each layer set partially before adding another.
- Use Silicone Molds: To avoid scratching or damaging your finished piece, choose silicone molds that are easy to remove once cured.
- Prevent Air Bubbles: To lessen air bubbles, you can slightly heat your resin before pouring it or use a heat gun after pouring it over your project, which will help release trapped air within the mixture.
- Curing Conditions: Make sure there’s no dust where you are curing your pieces! Also, ensure room temperature stays consistent throughout this process because direct sunlight may cause the darkening or warping of your final product.
However, if you follow these tips when making resin crafts with pressed flowers, they should turn out beautifully.
Creative Resin Projects with Pressed Flowers
- Coasters: Stunning coasters made with embedded pressed flowers in resin can be created using round or square silicone molds. These molds require flat flower placement for an even finish. Once cured, these coasters serve practical purposes as well as artistic centerpieces.
- Jewelry: You can design unique jewelry, such as pendants, earrings, bracelets, etc., by encasing nature within resin around dried plants, like tiny delicate blossoms, which fit inside chosen molds. This allows you to always carry some bits of nature wherever you go!
- Decorative Trays: Decorative trays can be made using larger molds. Different pressed flowers layered on top create vibrant designs perfect for serving or displaying around the house. When finished with a glossy topcoat, they will look amazing in any room and be durable enough to hold up against wear and tear over time!
These projects celebrate delicate beauty while promoting personal expression through the creative use of different mediums and art forms together with individual artists inspired ideas behind creations presented here today.
Common Mistakes to Avoid in Resin Flower Art
- The Mistake of Using Fresh Flowers: The most frequently made mistake is using fresh flowers instead of dried ones. Fresh flowers are moist and can rot or create bubbles when mixed with resin. Use only thoroughly dried flowers if you want your work to last long and look good.
- Not Preparing the Mould: Improperly preparing your mold can result in uneven finishes, sticking resin, or worse. You must ensure that the mold is clean before pouring any resin into it, and if needed, apply a release agent as well at this step for easy removal after curing.
- Pouring Too Quickly: If you rush while pouring the mixture, air pockets will be trapped inside and won’t distribute evenly throughout the whole thing. A better way would be to pour slowly in layers, allowing each time to settle before adding more on top, improving the final piece’s clarity and aesthetics.
Keeping these common mistakes in mind will help you create beautiful, durable works of art that best showcase pressed flowers.
Frequently Asked Questions (FAQs)
Q: What is a DIY microwave flower press kit?
A: A DIY microwave flower press kit, such as the Microfleur microwave flower press kit, is a tool that allows you to press flowers quickly using a microwave. It’s ideal for creating diy pressed flower crafts and gifts.
Q: How does the microwave method work for pressing flowers?
A: The microwave method dries the flowers quickly by heating and pressing them simultaneously. This method is faster than traditional pressing techniques and helps preserve the flowers’ color and structure.
Q: What flowers are suitable for microwave pressing?
A: You can press various flowers, from minor to larger ones. It’s a good idea to experiment with different types to see which ones give you the best results.
Q: What size is the Microfleur microwave flower press kit?
A: The Microfleur microwave flower press kit typically comes in different sizes, including an extra-large one that measures about 23 cm. This provides ample space for pressing larger flowers or multiple small flowers at once.
Q: How do I use the pressing kit for fast making for adults?
A: Fast making is simple using the pressing kit for adults. Place the flowers inside the pressing kit, secure the layers, and then microwave them according to the instructions. The process usually takes just a few minutes.
Q: Can I use the pressed flowers to make crafts?
A: Absolutely! Diy-pressed flower projects make for excellent crafty gifts and decorations. You can use the flowers to create artwork, greeting cards, bookmarks, and more.
Q: Are there any special care instructions for the pressed flowers?
A: To ensure your favorite pressed flowers last long, store them in a cool, dry place. Some kits come with a pressing kit and a storage bag.
Q: What happens if I’m unsatisfied with my Microfleur microwave flower press kit purchase?
A: Most sellers provide return instructions if you are unsatisfied with your purchase. Check the seller’s return policy when you buy the pressing kit.
Q: How does a microwave flower press kit compare to a regular one?
A: A microwave flower press kit is faster than a regular one. While the microwave method dries and presses flowers in minutes, a regular kit typically takes several days. This makes the microwave kit ideal for adults who are fast-making pressed plants.
Q: Can I use my microwave flower press kit to preserve flowers from a bouquet?
A: Using the microwave flower press kit, you can reserve flowers from a bouquet. This is a great way to keep flowers from special occasions, turning them into cherished memories and diy-pressed flower art.